Formulação do problema
Faça o Wi-Fi em um apartamento de 2+ quartos, de forma que a velocidade em qualquer local seja de pelo menos 90 Mbps em qualquer dispositivo móvel moderno (IEEE 802.11ac).
Presumimos que nosso apartamento típico contém um conjunto típico de usuários:
- Condicional apenas um usuário (usamos YandexDNS básico)
- Avó condicional com medo da Internet (YandexDNS, sem sites fraudulentos e vírus)
- Aluno condicional do 5º ano que precisa de Internet sem restrições (acesso à Internet via VPN para a Europa, DNS 8.8.8.8)
- Um estudante condicional da 7ª série, que, por motivos administrativos, precisa desligar a Internet às 21:00 durante a semana e às 22:00 nos fins de semana (usamos YandexDNS "Família" e desligamos / ligamos o SSID de acordo com a programação).
Simulação de rádio
Para começar, via de regra, se o apartamento tem paredes de concreto e o número de cômodos é 2 ou mais, então um ponto de acesso Wi-Fi não será suficiente, porque 20 Mbit / s no sofá perto da janela hoje não nos convém mais, o que significa que o nível mínimo de sinal no dispositivo cliente deve ser de pelo menos -65dB.
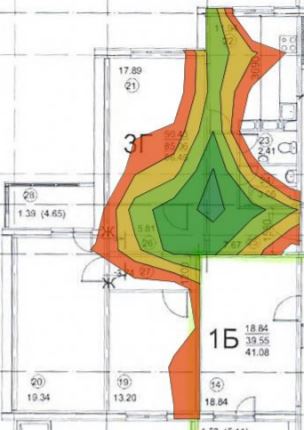
Aqui está um exemplo:
Colocamos um ponto de acesso no corredor, na faixa de 5 GHz a área de cobertura de até -65 dB se parece com isto:
Portanto, precisamos adicionar pelo menos mais 2 pontos de acesso, temos o seguinte:
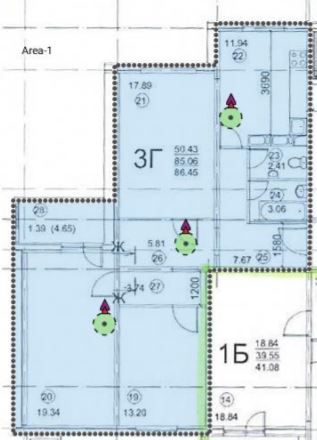
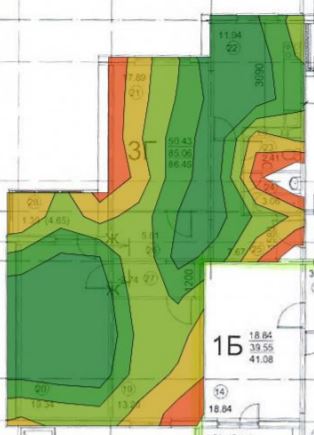

Já está melhor, decidimos o número e a localização dos pontos de acesso.
Configurando Wi-Fi baseado em Mikrotik hAP ac
1. Diagrama de rede e plano de endereço
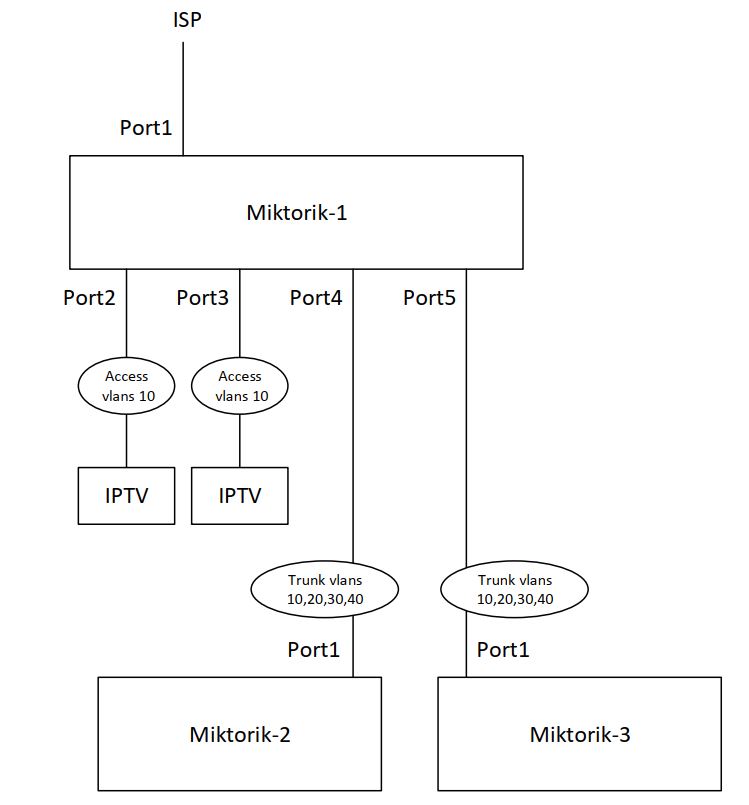

2. Atualização de software e instalação do pacote de suporte multicast para IPTV. É fácil para o Google.
3. Proponho a criação de 4 VLANs: 10,20,30,40, para cada tipo de usuário
/interface bridge vlan add bridge=bridge_vlan_10 tagged=VLAN_10_TRUNK_ETH5,VLAN_10_TRUNK_ETH4 vlan-ids=10 add bridge=bridge_vlan_20 tagged=VLAN_20_TRUNK_ETH5,VLAN_20_TRUNK_ETH4 vlan-ids=20 add bridge=bridge_vlan_30 tagged=VLAN_30_TRUNK_ETH5,VLAN_30_TRUNK_ETH4 vlan-ids=30 add bridge=bridge_vlan_40 tagged=VLAN_40_TRUNK_ETH5,VLAN_40_TRUNK_ETH4 vlan-ids=40 /interface vlan add interface=ether4 name=VLAN_10_TRUNK_ETH4 vlan-id=10 add interface=ether5 name=VLAN_10_TRUNK_ETH5 vlan-id=10 add interface=ether4 name=VLAN_20_TRUNK_ETH4 vlan-id=20 add interface=ether5 name=VLAN_20_TRUNK_ETH5 vlan-id=20 add interface=ether4 name=VLAN_30_TRUNK_ETH4 vlan-id=30 add interface=ether5 name=VLAN_30_TRUNK_ETH5 vlan-id=30 add interface=ether4 name=VLAN_40_TRUNK_ETH4 vlan-id=40 add interface=ether5 name=VLAN_40_TRUNK_ETH5 vlan-id=40 /interface bridge port add bridge=bridge_vlan_10 interface=ether2 pvid=10 add bridge=bridge_vlan_10 interface=ether3 pvid=10 add bridge=bridge_vlan_10 interface=wlan_2.4_GHz pvid=10 add bridge=bridge_vlan_10 interface=wlan_5_GHz pvid=10 add bridge=bridge_vlan_10 interface=VLAN_10_TRUNK_ETH5 priority=0 pvid=10 add bridge=bridge_vlan_20 interface=VLAN_20_TRUNK_ETH5 priority=0 pvid=20 add bridge=bridge_vlan_30 interface=VLAN_30_TRUNK_ETH5 priority=0 pvid=30 add bridge=bridge_vlan_40 interface=VLAN_40_TRUNK_ETH5 priority=0 pvid=40 add bridge=bridge_vlan_20 interface=wlan_2.4_GHz_virtual_2 pvid=20 add bridge=bridge_vlan_20 interface=wlan_5_GHz_virtual_2 pvid=20 add bridge=bridge_vlan_30 interface=wlan_2.4_GHz_virtual_3 pvid=30 add bridge=bridge_vlan_30 interface=wlan_5_GHz_virtual_3 pvid=30 add bridge=bridge_vlan_40 interface=wlan_2.4_GHz_virtual_4 pvid=40 add bridge=bridge_vlan_40 interface=wlan_5_GHz_virtual_4 pvid=40 add bridge=bridge_vlan_10 interface=VLAN_10_TRUNK_ETH4 priority=0 pvid=10 add bridge=bridge_vlan_20 interface=VLAN_20_TRUNK_ETH4 priority=0 pvid=20 add bridge=bridge_vlan_30 interface=VLAN_30_TRUNK_ETH4 priority=0 pvid=30 add bridge=bridge_vlan_40 interface=VLAN_40_TRUNK_ETH4 priority=0 pvid=40
4. Configure grupos para interfaces
/interface list add comment=defconf name=WAN add comment=defconf name=LAN /interface list member add list=LAN add interface=ether1 list=WAN add interface=bridge_vlan_10 list=LAN add interface=bridge_vlan_20 list=LAN add interface=bridge_vlan_30 list=LAN add interface=bridge_vlan_40 list=LAN
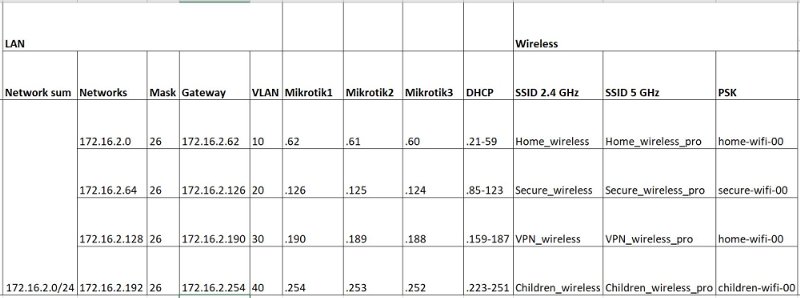
5. Defina os endereços IP nas interfaces LAN. Por exemplo, pegue a rede 172.16.2.0.24 e divida-a em 4 partes em / 26
/ip address add address=172.16.2.126/26 interface=bridge_vlan_20 network=172.16.2.64 add address=172.16.2.190/26 interface=bridge_vlan_30 network=172.16.2.128 add address=172.16.2.254/26 interface=bridge_vlan_40 network=172.16.2.192 add address=172.16.2.62/26 interface=bridge_vlan_10 network=172.16.2.0
6. Defina o endereço IP na interface WAN (se for estático)
/ip address add address=XXX.XXX.XXX.XXX/XXX interface=ether1 network=XXX.XXX.XXX.XXX
7. Defina a rota padrão para o provedor
/ip route add distance=1 gateway=XXX.XXX.XXX.XXX
8. Defina o servidor DHCP
/ip pool add name=vlan_10_dhcp_pool ranges=172.16.2.21-172.16.2.59 add name=vlan_20_dhcp_pool ranges=172.16.2.85-172.16.2.123 add name=vlan_30_dhcp_pool ranges=172.16.2.159-172.16.2.187 add name=vlan_40_dhcp_pool ranges=172.16.2.223-172.16.2.251 /ip dhcp-server network add address=172.16.2.0/26 dns-server=77.88.8.8,77.88.8.1 domain=home.local gateway=172.16.2.62 netmask=26 add address=172.16.2.64/26 dns-server=77.88.8.88,77.88.8.2 domain=home.local gateway=172.16.2.126 netmask=26 add address=172.16.2.128/26 dns-server=8.8.8.8,8.8.4.4 domain=home.local gateway=172.16.2.190 netmask=26 add address=172.16.2.192/26 dns-server=77.88.8.7,77.88.8.3 domain=home.local gateway=172.16.2.254 netmask=26 /ip dhcp-server add address-pool=vlan_10_dhcp_pool disabled=no interface=bridge_vlan_10 name=dhcp_server_vlan_10 add address-pool=vlan_20_dhcp_pool disabled=no interface=bridge_vlan_20 name=dhcp_server_vlan_20 add address-pool=vlan_30_dhcp_pool disabled=no interface=bridge_vlan_30 name=dhcp_server_vlan_30 add address-pool=vlan_40_dhcp_pool disabled=no interface=bridge_vlan_40 name=dhcp_server_vlan_40
9. Não se esqueça da espionagem de igmp para decodificadores de IPTV
/interface bridge add igmp-snooping=yes name=bridge_vlan_10 add igmp-snooping=yes name=bridge_vlan_20 add igmp-snooping=yes name=bridge_vlan_30 add igmp-snooping=yes name=bridge_vlan_40 /routing igmp-proxy interface add alternative-subnets=0.0.0.0/0 interface=ether1 upstream=yes
10. Faça um túnel VPN para o seu servidor VPS para contornar os bloqueios (a configuração de um servidor VPN no Debian estará abaixo)
/interface l2tp-client add connect-to=XXX.XXX.XXX.XXX disabled=no ipsec-secret=XXXXXXX keepalive-timeout=disabled name=l2tp-out1 password=XXXXXX profile=default use-ipsec=yes user=XXXXXX
11. Faça o roteamento baseado em política para o tráfego do SSID, o tráfego do qual deve passar pelo túnel VPN.
/ip firewall mangle add action=mark-routing chain=prerouting new-routing-mark=VPN_route_mark passthrough=yes src-address=172.16.2.128/26 /ip route add check-gateway=ping distance=1 gateway=10.1.1.1 routing-mark=VPN_route_mark
12. Faça NAT
/ip firewall nat add action=masquerade chain=srcnat out-interface-list=WAN src-address=172.16.2.0/25 add action=masquerade chain=srcnat out-interface=l2tp-out1 src-address=172.16.2.128/26 add action=masquerade chain=srcnat out-interface-list=WAN src-address=172.16.2.192/26
13. Você pode remover coisas desnecessárias das regras de firewall e, em seguida, fechar o que desejar.
/ip firewall filter add action=accept chain=input comment="defconf: accept established,related,untracked" connection-state=established,related,untracked add action=drop chain=input comment="defconf: drop invalid" connection-state=invalid disabled=yes add action=accept chain=input comment="defconf: accept ICMP" protocol=icmp add action=accept chain=input comment="defconf: accept to local loopback (for CAPsMAN)" dst-address=127.0.0.1 add action=drop chain=input comment="defconf: drop all not coming from LAN" disabled=yes in-interface-list=!LAN add action=accept chain=forward comment="defconf: accept in ipsec policy" ipsec-policy=in,ipsec add action=accept chain=forward comment="defconf: accept out ipsec policy" ipsec-policy=out,ipsec add action=fasttrack-connection chain=forward comment="defconf: fasttrack" connection-state=established,related disabled=yes add action=accept chain=forward comment="defconf: accept established,related, untracked" connection-state=established,related,untracked add action=drop chain=forward comment="defconf: drop invalid" connection-state=invalid disabled=yes add action=drop chain=forward comment="defconf: drop all from WAN not DSTNATed" connection-nat-state=!dstnat connection-state=new disabled=yes in-interface-list=WAN
14. Configurar perfis de segurança SSID
/interface wireless security-profiles set [ find default=yes ] supplicant-identity=MikroTik add authentication-types=wpa-psk,wpa2-psk eap-methods="" group-ciphers=tkip,aes-ccm mode=dynamic-keys name=Profile_Home_wireless supplicant-identity="" \ unicast-ciphers=tkip,aes-ccm wpa-pre-shared-key=home-wifi-00 wpa2-pre-shared-key=home-wifi-00 add authentication-types=wpa-psk,wpa2-psk eap-methods="" group-ciphers=tkip,aes-ccm mode=dynamic-keys name=Profile_Secure_wireless supplicant-identity=\ "" unicast-ciphers=tkip,aes-ccm wpa-pre-shared-key=secure-wifi-00 wpa2-pre-shared-key=secure-wifi-00 add eap-methods="" group-ciphers=tkip,aes-ccm name=Profile_Children_wireless supplicant-identity="" unicast-ciphers=tkip,aes-ccm wpa-pre-shared-key=\ children-wifi-00 wpa2-pre-shared-key=children-wifi-00
15. Configure o próprio Wi-Fi com quatro SSIDs
/interface wireless set [ find default-name=wlan1 ] band=2ghz-g/n country=russia distance=indoors installation=indoor mode=ap-bridge name=wlan_2.4_GHz security-profile=\ Profile_Home_wireless ssid=Home_wireless tx-power=13 tx-power-mode=all-rates-fixed vlan-id=10 wireless-protocol=802.11 wps-mode=disabled add keepalive-frames=disabled mac-address=XX:XX:XX:XX:XX:XX master-interface=wlan_2.4_GHz multicast-buffering=disabled name=wlan_2.4_GHz_virtual_2 \ security-profile=Profile_Secure_wireless ssid=Secure_wireless vlan-id=20 wds-cost-range=0 wds-default-cost=0 wps-mode=disabled add keepalive-frames=disabled mac-address=XX:XX:XX:XX:XX:XX master-interface=wlan_2.4_GHz multicast-buffering=disabled name=wlan_2.4_GHz_virtual_3 \ security-profile=Profile_Home_wireless ssid=VPN_wireless vlan-id=30 wds-cost-range=0 wds-default-cost=0 wps-mode=disabled add keepalive-frames=disabled mac-address=XX:XX:XX:XX:XX:XX master-interface=wlan_2.4_GHz multicast-buffering=disabled name=wlan_2.4_GHz_virtual_4 \ security-profile=Profile_Children_wireless ssid=Children_wireless vlan-id=40 wds-cost-range=0 wds-default-cost=0 wps-mode=disabled set [ find default-name=wlan2 ] band=5ghz-n/ac channel-width=20/40mhz-Ce country=russia distance=indoors installation=indoor mode=ap-bridge name=\ wlan_5_GHz security-profile=Profile_Home_wireless ssid=Home_wireless_pro tx-power=13 tx-power-mode=all-rates-fixed vlan-id=10 wireless-protocol=\ 802.11 add keepalive-frames=disabled mac-address=XX:XX:XX:XX:XX:XX master-interface=wlan_5_GHz multicast-buffering=disabled name=wlan_5_GHz_virtual_2 \ security-profile=Profile_Secure_wireless ssid=Secure_wireless_pro vlan-id=20 wds-cost-range=0 wds-default-cost=0 wps-mode=disabled add keepalive-frames=disabled mac-address=XX:XX:XX:XX:XX:XX master-interface=wlan_5_GHz multicast-buffering=disabled name=wlan_5_GHz_virtual_3 \ security-profile=Profile_Home_wireless ssid=VPN_wireless_pro vlan-id=30 wds-cost-range=0 wds-default-cost=0 wps-mode=disabled add keepalive-frames=disabled mac-address=XX:XX:XX:XX:XX:XX master-interface=wlan_5_GHz multicast-buffering=disabled name=wlan_5_GHz_virtual_4 \ security-profile=Profile_Children_wireless ssid=Children_wireless_pro vlan-id=40 wds-cost-range=0 wds-default-cost=0 wps-mode=disabled
16. Desligue a rede "infantil" em uma programação:
/system scheduler add interval=1d name=Switch_OFF_children_1 on-event=swich_off_children_2.4 policy=ftp,reboot,read,write,policy,test,password,sniff,sensitive,romon \ start-date=nov/28/2020 start-time=21:00:00 add interval=1d name=Switch_ON_children_1 on-event=swich_on_children_2.4 policy=ftp,reboot,read,write,policy,test,password,sniff,sensitive,romon \ start-date=nov/28/2020 start-time=07:00:00 add interval=1d name=Switch_OFF_children_2 on-event=swich_off_children_5 policy=ftp,reboot,read,write,policy,test,password,sniff,sensitive,romon \ start-date=nov/28/2020 start-time=21:00:00 add interval=1d name=Switch_ON_children_2 on-event=swich_on_children_5 policy=ftp,reboot,read,write,policy,test,password,sniff,sensitive,romon \ start-date=nov/28/2020 start-time=07:00:00 /system script add dont-require-permissions=no name=swich_off_children_2.4 owner=admin policy=ftp,reboot,read,write,policy,test,password,sniff,sensitive,romon source=\ "interface wireless disable wlan_2.4_GHz_virtual_4" add dont-require-permissions=no name=swich_on_children_5 owner=admin policy=ftp,reboot,read,write,policy,test,password,sniff,sensitive,romon source=\ "interface wireless enable wlan_5_GHz_virtual_4" add dont-require-permissions=no name=swich_on_children_2.4 owner=admin policy=ftp,reboot,read,write,policy,test,password,sniff,sensitive,romon source=\ "interface wireless enable wlan_2.4_GHz_virtual_4" add dont-require-permissions=no name=swich_off_children_5 owner=admin policy=ftp,reboot,read,write,policy,test,password,sniff,sensitive,romon source=\ "interface wireless disable wlan_5_GHz_virtual_4"
Não há administrador de rede e não é esperado, por isso não usamos o KID Control.
17. Deixe a capacidade de configurar o roteador localmente
/ip neighbor discovery-settings set discover-interface-list=LAN /tool mac-server set allowed-interface-list=LAN /tool mac-server mac-winbox set allowed-interface-list=LAN
18. Pequenas coisas
/system clock set time-zone-name=Europe/Moscow /system identity set name=Miktotik-1
No Miktotik-1, Miktotik-2 fazemos tudo igual, apenas alterando os endereços VLAN de acordo com o plano de endereços.
Servidor VPN Debian
XXX.XXX.XXX.XXX - public IP <source>#sudo apt-get install libgmp3-dev gawk flex bison make #sudo wget https://download.openswan.org/openswan/openswan-latest.tar.gz #sudo tar -xvzf openswan-latest.tar.gz #cd openswan-2.6.51 #sudo make programs #sudo make install #sudo nano /etc/ipsec.conf config setup nat_traversal=yes virtual_private=%v4:10.0.0.0/8,%v4:192.168.0.0/16,%v4:172.16.0.0/12 oe=off protostack=netkey conn L2TP-PSK-NAT rightsubnet=vhost:%priv also=L2TP-PSK-noNAT conn L2TP-PSK-noNAT authby=secret pfs=no auto=add keyingtries=3 rekey=no ikelifetime=8h keylife=1h type=transport left=XXX.XXX.XXX.XXX leftprotoport=17/1701 right=%any rightprotoport=17/%any #sudo nano /etc/ipsec.secrets XXX.XXX.XXX.XXX %any: PSK "PASSWORD" #sudo nano /root/ipsec #sudo iptables --table nat --append POSTROUTING --jump MASQUERADE #sudo echo 1 > /proc/sys/net/ipv4/ip_forward #for each in /proc/sys/net/ipv4/conf/* #do #echo 0 > $each/accept_redirects #echo 0 > $each/send_redirects #done #sudo /etc/init.d/ipsec restar #sudo chmod +x /root/ipsec #sudo sh /root/ipsec #sudo nano /etc/xl2tpd/xl2tpd.conf [global] port = 1701 ipsec saref = yes saref refinfo = 30 [lns default] ip range = 10.1.1.2-10.1.1.100 local ip = 10.1.1.1 refuse chap = yes refuse pap = yes require authentication = yes ppp debug = yes pppoptfile = /etc/ppp/options.xl2tpd length bit = yes name = VPN-1 #sudo nano /etc/ppp/options.xl2tpd require-mschap-v2 ms-dns 8.8.8.8 ms-dns 8.8.4.4 asyncmap 0 auth crtscts lock hide-password modem debug name VPN-1 proxyarp lcp-echo-interval 30 lcp-echo-failure 4 #sudo nano /var/log/syslog #sudo nano /etc/ppp/chap-secrets user-1 VPN-1 PASSWORD * #sudo /etc/init.d/ipsec restart sudo /etc/init.d/xl2tpd restart #sudo ipsec verify FIREWALL #sudo apt-get install ufw #sudo ufw disable #sudo ufw allow ssh #sudo ufw allow 500/udp #sudo ufw allow 1701/udp #sudo ufw allow 4500/udp #sudo ufw allow from 10.1.1.0/24 #sudo ufw default allow routed #sudo ufw delete ssh #sudo ufw allow 4444 #sudo ufw enable
Ver o status do FW
#sudo ufw status verbose
Veja os registros se algo estiver bloqueado
#sudo ufw logging low #sudo tail -f /var/log/ufw.log
Desative o registro para não obstruir o espaço em disco
#sudo ufw logging off
Mude a porta ssh para outra
sudo nano /etc/ssh/sshd_config Port 4444 sudo systemctl restart sshd
Verificando tentativas de hacking
sudo cat /var/log/auth.log | grep "authentication failure"
Feito!
Agora o servidor VPN funcionará mesmo com iPhone sobre 4G! E como uma boa adição - haverá acesso a todos os roteadores Mikrotik via SSH de um servidor VPS.